
Heat Pumps
How to insulate your attic and save money
Congratulations on buying a new house (or improving one you’ve loved for years)! In addition to new furniture and paint color, you’ll want to invest time in scoping out the attic insulation of your home.
Properly insulating your attic can save you a lot of money on your heating and cooling costs. It will also go a long way in keeping your home at a consistent temperature. Let’s explore types of attic insulation and tips on proper installation.
What is attic insulation?
Attic insulation creates a thermal barrier in your attic to stop the transfer of heat from the inside of your home to the outside in the winter and from the outside to the inside in the summer. Because heat is less likely to escape or invade your house, your living space stays consistently comfortable year-round.
A major benefit of insulating your home’s attic is that it helps protect against moisture. It also prevents your HVAC system from working too hard to maintain the desired temperature.
Differences between attic and roof insulation
Both attic and roof insulation are great ways to insulate your home and work best in combination to fully protect your home from temperature loss. While you may hear the two types used interchangeably, there are some notable differences between attic and roof insulation.
The biggest difference is where they are installed. Attic insulation will be installed in the attic area, while the roof insulation is installed on the actual roof slope above and below the rafters.
While adding or upgrading both is the best way to increase your home’s energy efficiency, we suggest insulating attic space if your budget allows for only one. Attic insulation is less expensive and will save you more money in the long run if used on its own.
For the purpose of this article, we’ll be mostly focusing on attic insulation, but a lot of this information can also apply to your roof insulation.
How does insulation work?
To understand how insulation works, you have to understand how heat flows from one point to another through conduction, radiation, or convection.
- Conduction is how heat moves through materials.
- Radiant heat travels in a straight line and heats everything in its direct path.
- Convection is the way heat moves through liquids and gasses, and why warmer air rises and cooler air falls.
Most insulating materials work by slowing conduction and convection heat. Reflective insulation systems reflect radiant heat so it cannot enter your home.
Save money by properly insulating your attic
The US Department of Energy estimates that, on average, 49% of a home’s energy is used by the heating and cooling system. Insulating an attic can help reduce your monthly energy cost by keeping conditioned air in and outdoor air out.
The Department of Energy also estimates that a properly insulated attic can lower your energy bill by 10 to 15%. For many homeowners, that’s nearly $200 in savings per year.
Before you buy insulation materials
In almost every circumstance, it’s highly recommended to add attic insulation. However, on rare occasions, installing insulation can cause serious damage.
Some older homes were built with large gaps between the walls to create a moisture barrier. The gaps let moisture dry without causing damage to the home’s structure. If you fill in these spaces with insulation, you will absorb all of that excess moisture, which can cause mold and rotten wood.
A similar issue could occur if you have an old or wood-shingled roof. Installing attic or roof insulation near the ceiling could cause you to experience moisture issues. Older roofing materials were made to get wet and dry back out, but water will accumulate if insulation blocks the way.
Avoid placing insulation around knob and tube wiring. This type of wiring is outdated and no longer used in newer homes. In the early 1900s, knob and tube wiring was an accessible and cheap way to wire homes. It was phased out in the 1940s. If you’re living in an older home, check to make sure you aren’t adding insulation around this type of wiring because it can pose a serious fire hazard.
Inspecting your attic insulation
First, you should go into your attic and inspect the condition of your current insulation. Your attic needs to have a certain amount of insulation to work as effectively as possible.
As a general rule, the US Department of Energy recommends adding more insulation if you measure less than 8 inches of cellulose or less than 11 inches of rock wool or fiberglass. The climate in which you live also affects how much insulation you will need.
Materials you need before inspection:
- Boards to walk on, if needed
- Tape measure
- Flashlight or headlight
- Hard hat or cap to protect your head from sharp roofing nails
- Safety glasses
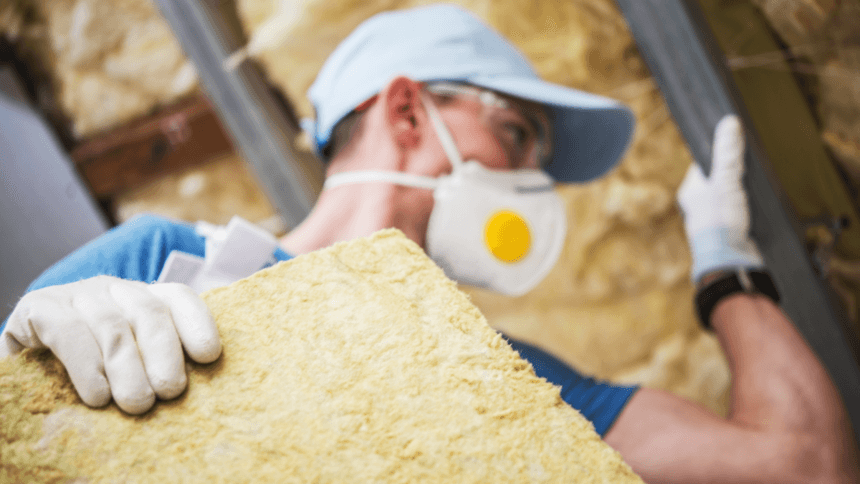
- Gloves
- Dust mask or protective face mask
- Protective suite
Some attics use vermiculite for insulation, which may contain asbestos. Vermiculite is a lightweight, pea-size, flaky gray mineral. Do not disturb the vermiculite insulation unless it has been tested by an approved lab to ensure it does not have any traces of asbestos. Contact your local health department for a list of approved labs.
How to quickly check your insulation levels
Looking across your attic, is your insulation level with or below the attic floor joints? If it is, you need more insulation. If you cannot see any of the floor joints, you probably have enough insulation.
It’s important that the insulation is evenly distributed with no low spots. You may see a lot of insulation in the middle of your attic, but there could be very little along the edges. Make sure you check throughout the entire attic.
How to measure your insulation levels
One way to measure your insulation is to look for the R-value printed on the batts of your existing insulation. Batts are pieces of fiberglass used to insulate your home.
Another way to measure is by using a tape measure to evaluate the depth of the insulation in inches. Once you’ve got your measurements, refer to the table below from Energy Star to understand what type of insulation you have and your resulting R-value.
| Category | What do you see? | Type of insulation | Total R-value |
| Loose-fill fibers | Lightweight yellow, pink, or white | Fiberglass | 2.5 x depth |
| Dense gray or near white, may have black specs throughout | Rock or mineral wool | 2.8 x depth | |
| Small, gray, flat pieces or fibers (from newsprint) | Cellulose | 3.7 x depth | |
| Granules | Lightweight | Vermiculite or perlite | 2.7 x depth |
| Batts | Lightweight yellow, pink, or white | Fiberglass | 3.2 x depth |
What is an R-value?
Your insulation material’s resistance to conductive heat is measured or rated by its thermal resistance, or the R-value. The higher the R-value, the better the material is at insulating your home.
The R-value depends on the density of your insulation, the type you use, and its thickness. The R-value of some insulations also depends on how old it is, temperature, and moisture accumulation. When calculating the R-value of a multilayered installation, add all of the R-values of the individual layers together.
In general, increasing your insulation’s thickness also increases the R-value. However, when using a loose-fill option, the density of the insulation increases as it compresses under its own weight. This compression keeps the loose-fill R-value from increasing proportionally with the insulation’s thickness.
Where you live affects your insulation needs
Depending on where you live in the US, your home will need different insulation needs. If you live in a warmer climate, you may not need as much insulation as you would if you lived somewhere that sees a lot of snow and ice.
Energy Star has mapped out recommended R-values based on where your home is located throughout the country.
| Zone | Add the following insulation levels to your attic | |
| For uninsulated attics | For attics with existing 3−4 inches of insulation | |
| 1 | R30 to R49 | R25 to R30 |
| 2 | R30 to R60 | R25 to R38 |
| 3 | R30 to R60 | R25 to R38 |
| 4 | R38 to R60 | R38 |
| 5 to 8 | R49 to R60 | R38 to R49 |
What type of insulation should you buy?
There are many different options for insulation, and the right choice depends on your home’s needs. You should consider the type of insulation as well as the material you want to use.
Types of attic insulation
Blanket insulation
This is one of the most common types of insulation for attic floors. You should not use this insulation for open spaces because fiberglass particles can enter the air and hurt your home’s air quality. Cut thick pieces of insulation to fit tightly between gaps in your wooden frames and around pipes and wires.
While this is one of your most inexpensive options and easiest to install, it isn’t as effective as a spray foam. Make sure to wear a breathing mask and protective gloves when installing this type of insulation because it can irritate your skin and lungs.
Spray foam
The primary type of attic insulation used by contractors is spray foam. Paired with blanket insulation, which is better for edges and corners, this spray can seal gaps in existing walls and make installation much easier. While it is the most expensive option in our list, spray foam is the best at insulating your home against hot and cold air.
The spray is made of liquid polyurethane, which expands and hardens into a solid foam. If you haven’t used spray foam before, you should hire a professional to properly seal all of the nooks and cracks in your attic.
Foam boards
Easy to install and relatively inexpensive, foam boards are another insulating option. They are usually made of polyurethane, polystyrene, or polyisocyanurate. Sheets of foam can be cut to fit tightly between wall studs or attic ceiling joints.
Foam boards are not the best insulators on our list, which makes them less popular than spray foam and blanket insulation. On the plus side, they do not accumulate moisture or mold like blanket insulation can.
Radiant foil
This type of insulation is designed to reflect heat away from the home and should be paired with houses in warmer climates. This is also the least expensive option on our list.
The foil’s reflective barrier is attached to kraft paper or polyethylene bubbles. The bubbles prevent heat transfer by creating a pocket of air that slows down the rate in which heat can reach your home.
Types of insulation material
Attic insulation comes in a variety of materials, including fiberglass, rock wool, cellulose, liquid polyurethane, polystyrene, and more.
- Fiberglass: Made from tightly woven fibers that are light and simple to cut and install. The R-value is 2.7 per inch and is often used in blanket insulation. This option has the lowest R-value of all of our recommendations.
- Rock or mineral wool: Made of a stone-based mineral fiber, it contains basalt rock and recycled steel slag. The R-value is 3.3 per inch.
- Cellulose: This is regularly used in building insulation and consists of materials like cardboard, cotton, newspaper, straw, hemp, and sawdust. The R-value is 3.8 per inch.
- Liquid polyurethane: A top ingredient in spray foam insulation. The R-value ranges from 3.5 to 6.5 per inch depending on if it’s open-cell (3.5) or closed-cell (6.5) spray. The closed-cell spray has the greatest R-value of all of the options we recommend.
- Polystyrene: Used to create foam boards. The R-value ranges from 3.8 to 5 per inch depending on if the material is styrofoam (expanded polystyrene) or extruded polystyrene. Extruded polystyrene has better insulation. The two R-values are represented in two different colors, pink and blue.
How much will attic insulation cost?
The average attic insulation costs $0.30 to $1.50 per square foot depending on the material you choose. Installing insulation is a challenge that a well-seasoned DIY enthusiast may be able to tackle. You can also save yourself the hassle by calling a qualified contractor.
For an estimate on your final cost, find out how much your insulation costs per square foot. Then multiply that amount by the size of your attic. For example, a 500 square foot attic could vary between $150 to $700 if you do it yourself. If you’d prefer a professional to install your insulation, expect to add an additional $200 to $500.
You may be eligible for financial assistance through your state’s Weatherization Assistance Program (WAP). Visit the WAP site and select your state of residence for more details.
Preparing for installation
If you want to try your hand at adding insulation yourself, remember to take precautionary steps to ensure your safety.
Safety equipment
- Boards to walk on, if needed
- Flashlight or headlight
- Hard hat or cap to protect your head from sharp roofing nails
- Safety glasses
- Gloves
- Dust mask or protective face mask
- Protective suite
Materials and tools
- Insulation
- Retractable utility knife
- Sheet metal scissors
- Tape measure
- Straight edge for cutting
Safety recommendations
- The US Environmental Protection Agency (EPA) recommends sealing the attic before you start adding in attic insulation.
- Wear gloves, safety glasses and a protective mask when handling insulation, especially fiberglass.
- Gather all tools and supplies to minimize trips into and out of the attic.
- Work in a well-lit area so you can keep an eye on tools and hazards.
- Start working early in hot weather. Attics heat up quickly as the day gets warmer.
- Drink plenty of water.
- Wear knee pads if your attic requires crawling.
- Watch out for nails pointing up through the ceiling or down from the roof.
- Only walk on joists or truss chords, or you may fall through the ceiling. Never walk on exposed drywall or insulation.
How to insulate an attic
- Choose your insulation
You do not have to use the same type of insulation that is currently in your attic. Loose-fill can go on top of fiberglass or blanket insulation, and vice versa. If you do choose loose-fill, you will need to rent a blowing machine from a home improvement store or hire a professional that already has the proper equipment.
- Lay down your insulation
Use whatever method is recommended for your selected insulation, whether that’s using special machinery or laying it down by hand. If you choose to use blanket insulation, install the second layer on top of and perpendicular to the first. This will help cover the tops of your joists and reduce heat transfer.
- Create barriers
Use sheet metal or wire mesh to form a barrier around fixtures and vents. Keep your insulation away from recessed can lights to avoid fire hazards. Some recessed lights are designed for insulation contact (IC) and won’t need a barrier. Look for an “IC” on the light to know if it can safely touch insulation.
Things to remember
- Insulation expands once it is unpackaged. Keep it wrapped until you are ready to use it.
- If you compress insulation to make it fit, the product can lose a lot of its R-value. Instead, measure where you’re placing the insulation and cut it to size.
- To cut blanket insulation, place it over a piece of plywood with the paper or foil side down. Put a two-by-four on top to momentarily compress the insulation to a manageable thickness. Use a utility knife to cute along the edge of the two-by-four, through the insulation, and down to the plywood. Remove the two-by-four to stop compressing your insulation as soon as possible.
Attic insulation: DIY or pro?
Depending on your comfort level with handling the attic insulation, you may consider this task a DIY project. For those who prefer to have a professional handle the job, remember that the attic insulation cost will be offset by your savings in energy spending each month.
Opting to install or upgrade the insulation in your attic is a home improvement project that offers immediate and long-term benefits. As you look to improve the energy efficiency of your home, consider these top HVAC brands when it’s time to replace your aging unit.